FAQ's
Site/Surface Preparation – Western Environmental Liner will not be held responsible or liable for any subgrade, earthwork or engineering design as the items below are recommendations based off experience.
Sub-grade:
- The area to be lined must be flat and smooth, dry, and free of rocks, rubble, roots, vegetation, debris, voids, protrusions, and any other objects that can potentially puncture the liner through time.
Bedding:
- If the sub-grade cannot meet the above specification, placing a layer of bedding at a minimum of 6″ compacted above the highest lying obstruction is recommended. Bedding material can be clean dirt, sand, clay, etc. This recommendation can also be used as a design preference.
Backfill/Liner Protection:
- If potential liner puncture from wildlife, livestock or animal traffic is not a concern, a minimum of 4″ of compacted backfill is sufficient.
- If puncture due to wildlife traffic is a concern, at least 12″ of compacted backfill is recommended.
- A geotextile fabric (8, 12, or 16oz gauge) may be used for extra protection. This can be placed above the liner then backfilled, or used as an underlayment, or 2 layers so the liner is sandwiched with the geotextile fabric. Although heavier gauge is available, 8 oz is sufficient and is the most common in the industry.
Liner Termination:
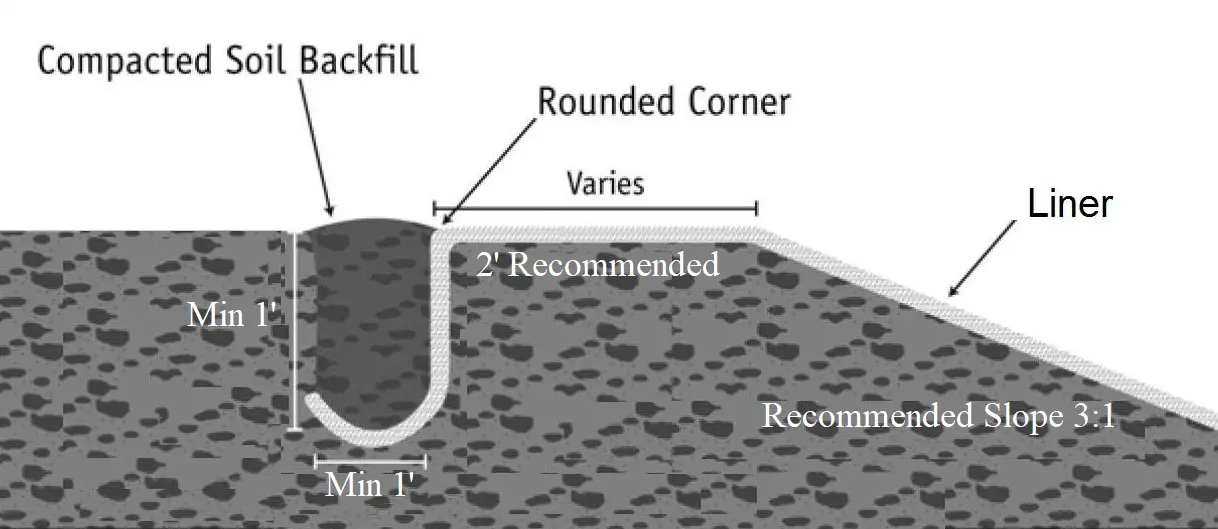
- If the liner is terminated around the perimeter via an earthen-anchor trench, trench must be a minimum of 1′ deep x 1′ wide. Liner must be laid relaxed in the trench depth and bottom width.
- If the liner is terminated to concrete, the concrete structure must be solid and strong enough to withstand drilling for batten strip attachment. Screws are normally drilled in 2.5″ deep.
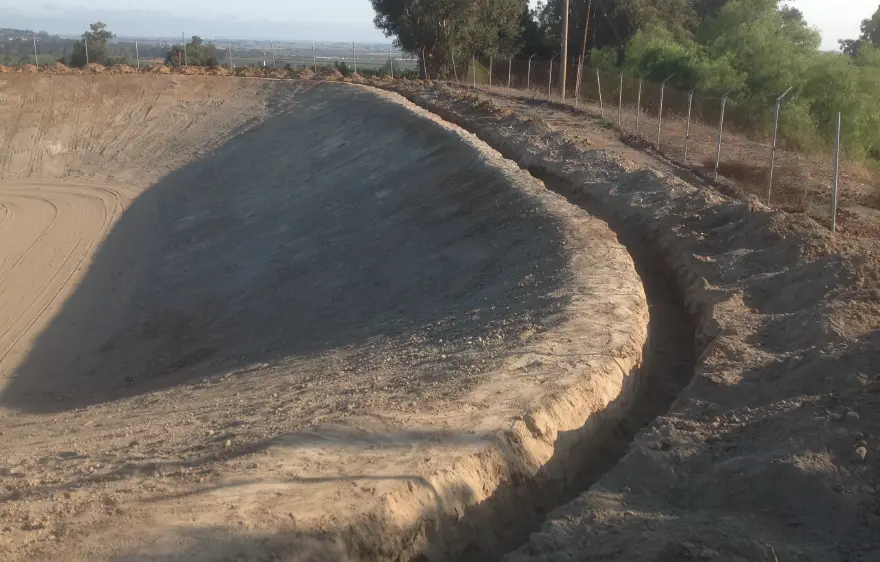
Anchor Trench – Designed to anchor the liner to an earthen berm. This helps prevent wind uplift during the installation process. May also prevent water to go behind the liner that may cause slope erosion. Western Environmental Liner recommends that an anchor trench is dug around the pond perimeter above water level. This is normally dug at the very top of the berm. Excavated dirt may be used to backfill the trench perimeter after the liner is laid into the anchor trench. Backfilled soil must be compacted to secure the liner. Apply caution during the compaction process so as not to tear or puncture the liner. See Anchor Trench detail:
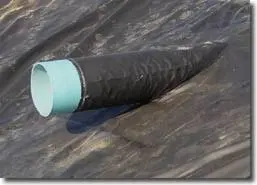
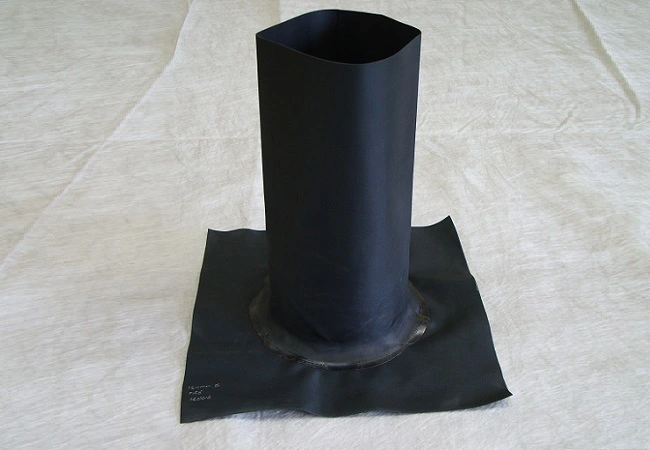
If there is a pipe/column or other protrusion that the liner needs to be sealed around, a custom-made boot must be utilized. Western Liner will prefabricate a custom-boot based on each pipe’s outside diameter and closest degree configuration. We are going to send you a kit of what you need for the installation or advise you of what you need to procure locally. A Western Liner sales team member will walk you through the process on how to seal pipes and liner penetration specific to your need.
It depends on the subgrade and on the preferred design. Western Liner will make a practical recommendation. A geotextile fabric underlayment may be used to protect the geomembrane liner from potential puncture and tear.
If earthwork finish is not smooth, this may cause a potential puncture or tear to the liner through time or during the installation process. Western Environmental Liner will make a recommendation of a layer of geotextile fabric as an underlayment. This can be made the same size as the liner material to simplify the installation logistics. If applicable, geotextile liner needs to be unrolled first then the geomembrane liner will be installed above the geotextile fabric.
If the liner material will be completely backfilled with crushed rocks or sharp aggregate, a geotextile fabric can be place above the liner material in order to protect the liner from potentially puncturing.
Geotextile can be used for extra protection for your primary liner by being placed under, on top or on both sides of the liner. Having an underlayment can prolong the life of your liner, protecting it from any sharp objects that could possibly puncture the liner, making it more durable and long lasting.

The majority of the time, the liner is folded and rolled so it can be palletized for transport. Pallet sizes can range from 4′ x 7′ or to 8′ x 8′ pallet, depending on the size of the liner. There are some instances that the liner may be too large ship LTL Freight and will need to be loaded in a dedicated flat bed. If your shipment is approximately 4,500 lbs. or over, we may have to use a Flatbed for delivery which may increase the cost of shipping. Ask one of our liner experts how your liner size will be packaged for shipping.
The liner itself will be wrapped with a protective layer prior to shipping and can be equipped with straps so the liner can be lifted off using an equipment without forks. This also help us move or spot the liner in place without the pallet.
Unrolling Directions – The rolled liner is moved to the installation location by lifting equipment and then unrolled in one (or two) directions and unfolded across the pond. Feel free to request an unrolling direction specific to your order and project. See sample unrolling directions:
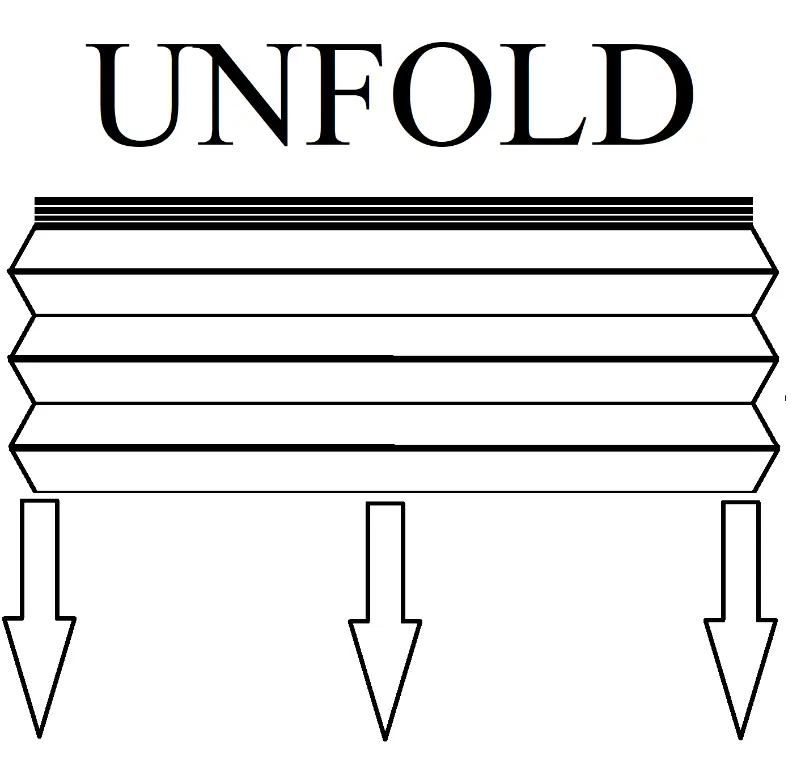
Unrolling Direction : Liner Unrolled from the middle then unfolded to 1 end.
Here is a sample image of a liner that is fan-folded to 1 end and rolled to the middle. You will be receiving a liner that may be wrapped in geotextile and palletized. When the geotextile packaging material has been taken off, the liner will look like 2 large rolls right next to each other. The liner will also be labeled with unrolling direction and length of liner when unrolled and length of the side to be unfolded. As liners are custom made, these dimensions can vary. Talk to one of our liner specialists to make sure you have a clear direction prior to unrolling the liner.
Step 1: Spot the liner in place.
Step 2: Unroll the liner to opposite directions.
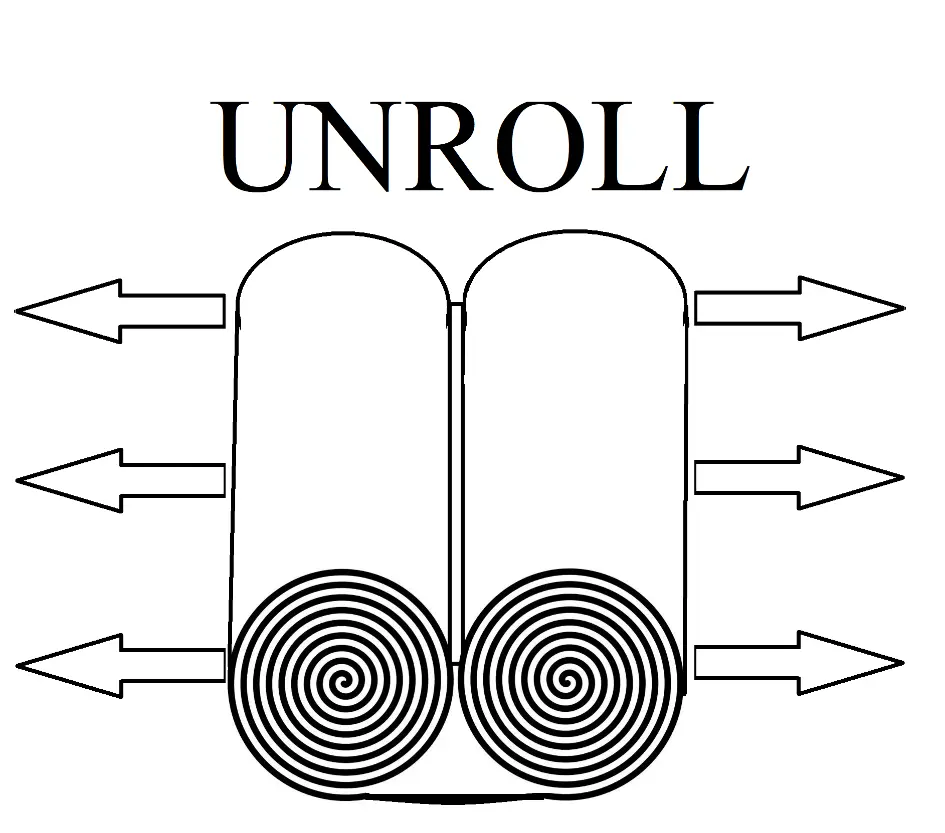
Step 3: Unfold the liner.
Unrolling Direction : Liner To Unroll From One End, Then Unfold To One End.
Here is a sample image of a liner that is fan-folded to 1 end and rolled to 1 end. Once the liner has been unwrapped, pay attention to the liner label. A liner rolled to 1 end will look like a huge roll, think long cinnamon roll sideways. Talk to one of our liner specialists to make sure you have a clear direction prior to unrolling the liner.
Step 1: Spot the liner in place.
Step 2: Unroll the liner from 1 end.
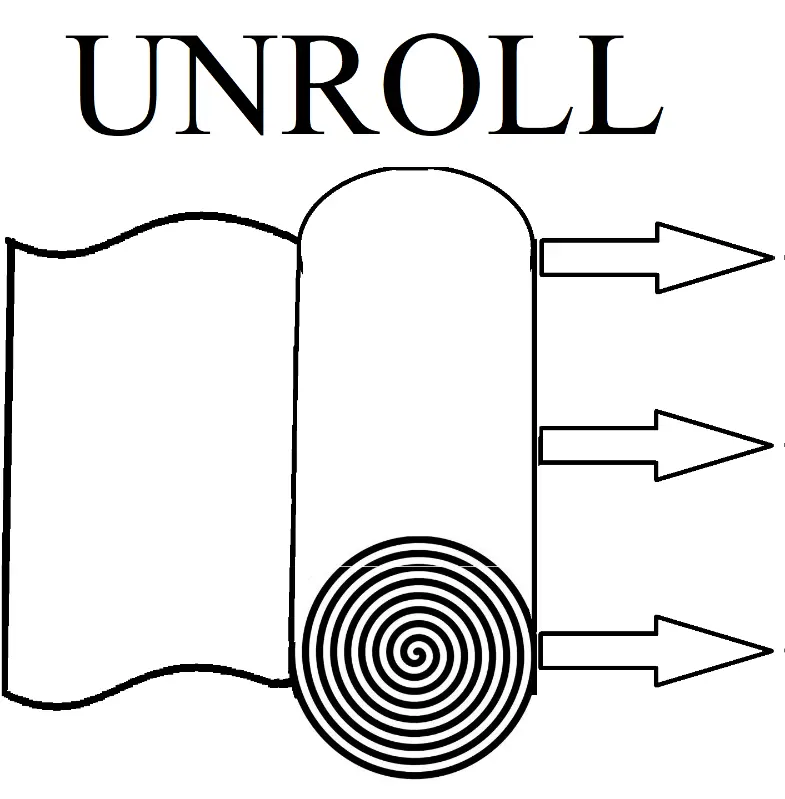
Step 3: Unfold the liner
For multi-piece liners, Western Environmental Liner provides a panel layout and unrolling direction as requested. Please do not hesitate to ask.
Field Seaming – The majority of our liners are prefabricated into larger panels so that majority of the seams are done under a controlled environment, mostly indoor and in a smooth surface. If the liner is made in 1 piece, there may not be any field seaming necessary, except for pipe boot penetration details.
Installation – We have a couple of different options if you are looking to have your liner installed by our team. Depending on the job and budget for the project, we can provide either an installation supervisor to assist with installation and any field seaming that needs to be completed or even a full crew if necessary. Please call for details and pricing.
For large projects, it may be necessary for the liner to be made in multiple pieces in order to make it easier to transport and more manageable to maneuver during installation. When this applies to the project, these liners are to be joined together through field seaming. Field seaming can be done through multiple ways and at varying cost and convenience. Speak with a liner specialist and to get a better feel and understanding of which option is most suitable or preferable for your project. Below are some options that we offer:
- DIY approach – Western Liner can provide you portable heat gun set as a tool for you to seam the liners on site. Our liner specialist will walk you through the process and educate you on how to use this tool in order to be successful at doing it yourself. This will save you a significant cost on installation.
- Liner Supervisor – Western Liner will provide Supervisors who can supervise your crew during the installation process. This approach will require that you will be provide a man-power minimum of 6 people to take care of the unrolling of the liner and any other tasks delegated by Western Liner Supervisor. Western Liner Supervisor/s will provide the direction, take care of all necessary field seaming, pipe sealing, concrete attachment and other details applicable in the project. Western Liner Supervisors may operate the provided equipment as well during the installation process.
- Installation Crew – Western Environmental Liner team will take care of all the unrolling of the liner material and any necessary field seaming.
Below is our most common scope in the project:
- Western Environmental Liner does not do earthwork during installation. The project area has to be ready, trenched around the perimeter, dry, and free of rocks, rubble, roots, vegetation, debris, voids, protrusions, and any other objects that can possibly puncture the liner.
- Customer will need to provide a crew to backfill the trench as liner installation goes.
- The weather must be suitable for liner installation, preferably sunny with zero to low chance of rain. Rain, wind and snow may delay or prohibit liner installation. It is the customers responsibility to double check that the local weather is suitable for liner installation.
- Please allow 3-4 weeks for liner fabrication and installation coordination. Timeframe may be decreased if necessary, depending on our capacity.
A custom fabricated Pipe Boot can be made to fit around and seal pipe penetrations going through the liner material. See sample image below. Depending on the project and your preference, this can either be installed by you or by a Western Liner Supervisor.
Fabrication/Delivery Time – Our standard fabrication time is 2 weeks and transit time is about 1 week. If you need your liner sooner, let us know and we can check our production capacity to see if we can accommodate an earlier date of completion. Please note that you will need equipment to unload the liner upon delivery and freight cost may change for deliveries to residential, construction, farm, school, etc. It is very important to communicate these scenarios to in order to avoid unforeseen additional costs.
Sunlight & UV Resistance – UV, direct sunlight and weathering can impact the longevity of your liner. We offer a variety of liner materials that will match up with your particular job and specific application to ensure that your liner meets both your short- and long-term needs. Our liners carry a 10 to 20-year weathering and UV warranty to ensure you get the needed lifespan out of your liner. Please call for details and material specifications.
Majority of the geomembrane liners we carry are fish friendly. Most are NRCS NSF 61 certified so it can be used for potable drinking water containment.
Our raw materials normally come in 12′ rolls therefore one side needs to be divisible by the roll width. We have to weld and overlap together in order to make it the liner size you need, and we lose 2″ for each overlap. The weld size is the final size of the liner after factory seams and overlap.
In the areas where you are expecting constant water pressure, the long-term solution is to have a concrete structure as a splash pad so the liner does not tear through time. If that is not doable, we can put a reinforcement in the area although this area may still tear through time due to constant water pressure. A solid rubber mat or rip rap may be placed above the liner material to prevent the water pressure from directly hitting the liner.